Going Further with Git#
It’s got three keyboards and a hundred extra knobs, including twelve with ‘?’ on them.
— Terry Pratchett
Two of Git’s advanced features let us to do much more than just track our work. Branches let us work on multiple things simultaneously in a single repository; pull requests (PRs) let us submit our work for review, get feedback, and make updates. Used together, they allow us to go through the write-review-revise cycle familiar to anyone who has ever written a journal paper in hours rather than weeks.
Your zipf project directory should look like this:
zipf/
├── bin
│   ├── Zipf.ipynb
│   ├── collate.py
│   ├── wordcount.py
│   ├── plotcount.py
│   └── zipf_test.py
├── data
│   ├── README.md
│   ├── dracula.txt
│   ├── frankenstein.txt
│   └── ...
└── results
    └── ...
All of these files should also be tracked in your version history. We’ll use them and some additional analyses to explore Zipf’s Law using Git’s advanced features.
In this chapter we try to walk through some of the advanced git concepts using the Zipf repository as an example. You can either copy the tutorial step by step or take it as a guide for your own project.
What’s a Branch?#
So far we have only used a sequential timeline with Git: each change builds on the one before, and only on the one before. However, there are times when we want to try things out without disrupting our main work. To do this, we can use branches to work on separate tasks in parallel. Each branch is a parallel timeline; changes made on the branch only affect that branch unless and until we explicitly combine them with work done in another branch.
We can see what branches exist in a repository using this command:
$ git branch
* main
When we initialize a repository, Git automatically creates a branch called main. It is often considered the “official” version of the repository.
The asterisk * indicates that it is currently active,
i.e., that all changes we make will take place in this branch by default.
(The active branch is like the current working directory in the shell.)
Default Branches
In mid-2020, GitHub changed the name of the default branch (the first branch created when a repository is initialized) from “master” to “main.” Owners of repositories may also change the name of the default branch. This means that the name of the default branch may be different among repositories based on when and where it was created, as well as who manages it.
Creating a Branch#
To create a new branch called new_feature,
we run:
$ git branch new_feature
We can check that the branch exists by running git branch again:
$ git branch
* main
  new_feature
Our branch is there, but the asterisk * shows that we are still in the main branch. (By analogy, creating a new directory doesn’t automatically move us into that directory.) As a further check, let’s see what our repository’s status is:
$ git status
On branch main
nothing to commit, working directory clean
To switch to our new branch we can use the checkout command that we first saw in Chapter git command line:
$ git checkout new_feature
$ git branch
  main
* new_feature
In this case, we’re using git checkout to check out a whole repository,
i.e., switch it from one saved state to another.
We should choose the name to signal the purpose of the branch,
just as we choose the names of files and variables to indicate what they are for.
We haven’t made any changes since switching to the new_feature branch,
so at this point main and new_feature are at the same point in the repository’s history.
Commands like ls and git log therefore show that the files and history haven’t changed.
Where Are Branches Saved?
Git saves every version of every file in the
.gitdirectory that it creates in the project’s root directory. When we switch from one branch to another, it replaces the files we see with their counterparts from the branch we’re switching to. It also rearranges directories as needed so that those files are in the right places.
Adding changes and comparing them.#
For our example we will start by adding a README.md into the project root
$ touch README.md
$ echo "# Zipf" > README.md
$ git add README.md
$ git commit -m "docs: add initial README file with project title"
[new_feature 3b6859d] docs: add initial README file with project title
 1 file changed, 1 insertion(+)
 create mode 100644 zipf/README.md
You should also push these changes using:
$ git push --set-upstream origin new_feature
Now we make changes to the readme file.
$ echo "# RSE tutorial - Zipf!" > README.md
If we look at the last couple of commits using git log, we see our most recent change:
$ git log --oneline -n 2
8cd0fc5 (HEAD -> new_feature, origin/new_feature) feat: add project overview and book link to README
3b6859d docs: add initial README file with project title
(We use --oneline and -n 2 to shorten the log display.) But if we switch back to the master branch:
$ git checkout main
$ git branch
  new_feature
* master
and look at the log, our change is not there:
$ git log --oneline -n 2
a15777d (HEAD -> main, origin/main, origin/HEAD) fix: correct spelling in README
27775a1 docs: update weekly assignments
We have not lost our work:
it just isn’t included in this branch.
We can prove this by switching back to the new_feature branch and checking the log again:
$ git checkout fit
$ git log --oneline -n 2
8cd0fc5 (HEAD -> new_feature, origin/new_feature) feat: add project overview and book link to README
3b6859d docs: add initial README file with project title
We can also look inside README.md and see our changes.
If we make another change and commit it, that change will also go into the new_feature branch. For instance, we could add some additional information.
With your text editor of choice you could do something like this:
# RSE tutorial - Zipf!

In this folder you find the necessary data and scripts used in the RSE-UP book that can be found [here](https://se-up.github.io/RSE-UP/chapters/welcome.html).
$ git add README.md
$ git commit -m "docs: add project overview and book link to README"
[new_feature 55178f0] docs: add project overview and book link to README
 1 file changed, 2 insertions(+)
Finally, if we want to see the differences between two branches,
we can use git diff with the same double-dot .. syntax used to view differences between two revisions:
$ git diff main..new_feature
Why should you use Branches?
Why go to all this trouble? Imagine we are in the middle of debugging a change like this when we are asked to make final revisions to a paper that was created using the old code. If we revert
README.mdto its previous state we might lose our changes. If instead we have been doing the work on a branch, we can switch branches, create the plot, and switch back in complete safety.
Merging#
We could proceed in three ways at this point:
Add our changes to
README.mdonce again in themainbranch.Stop working in
mainand start using thenew_featurebranch for future development.Merge the
new_featureandmainbranches.
The first option is tedious and error-prone; the second will lead to a bewildering proliferation of branches, but the third option is simple, fast, and reliable. To start, let’s make sure we’re in the main branch:
$ git checkout main
$ git branch
  new_feature
* main
We can now merge the changes in the new_feature branch into our current branch
with a single command:
$ git merge new_feature
Merge made by the 'ort' strategy.
 zipf/README.md | 4 ++++
 1 file changed, 4 insertions(+)
 create mode 100644 zipf/README.md
Merging doesn’t change the source branch new_feature, but once the merge is done,
all of the changes made in new_feature are also in the history of main:
$ git log --oneline -n 4
5df6f8f (HEAD -> main) Merge branch 'new_feature'
55178f0 (origin/new_feature, new_feature) docs: add project overview and book link to README
8cd0fc5 feat: add project overview and book link to README
3b6859d docs: add initial README file with project title
Note that Git automatically creates a new commit (in this case, 5df6f8f)
to represent the merge. If we now run git diff main..new_feature, Git doesn’t print anything because there aren’t any differences to show.
Now that we have merged all of the changes from new_feature into main
there is no need to keep the new_feature branch, so we can delete it:
$ git branch -d new_feature
Deleted branch new_feature (was 55178f0)
Handling Conflicts#
A conflict occurs when a line has been changed in different ways in two separate branches or when a file has been deleted in one branch but edited in the other. Merging new_feature into main went smoothly because there were no conflicts between the two branches, but if we are going to use branches,
we must learn how to merge conflicts.
To start, let’s check the current state of the file called README.md in the main branch:
$ cat README.md
# RSE tutorial - Zipf!
...
Now let’s create a new development branch called docs to work on improving the documentation for our code. We will use git checkout -b to create a new branch and switch to it in a single step:
$ git checkout -b docs
Switched to a new branch 'docs'
$ git branch
* docs
  main
On this new branch, let’s add some information to the README file:
# RSE tutorial - Zipf!

These Zipf's Law scripts tally the occurrences of words in text files.

In this folder ....
$ git add README.md
$ git commit -m "docs: add Zipf's law description to README"
[docs 0b72d0e] docs: add Zipf's law description to README
 1 file changed, 2 insertions(+)
In order to create a conflict, let’s switch back to the main branch.
The changes we made in the docs branch are not present:
$ git checkout main
Switched to branch 'main'
$ cat README.md
# RSE tutorial - Zipf!

In this folder ....
Let’s add some information about the contributors to our work:
# RSE tutorial - Zipf!

In this folder you find the necessary data and scripts used in the RSE-UP book that can be found [here](https://se-up.github.io/RSE-UP/chapters/welcome.html).

## Contributors
- Niko Bertrand
$ git add README.md
$ git commit -m "docs: add Contributors section with initial contributor to README"
[main 885a8c7] docs: add Contributors section with initial contributor to README
 1 file changed, 2 insertions(+)
We now have two branches,
main and docs,
in which we have changed README.md in different ways:
$ git diff docs..main
diff --git a/README.md b/README.md
index f40e895..71f67db 100644
--- a/README.md
+++ b/README.md
@@ -1,4 +1,5 @@
 # Zipf's Law
-These Zipf's Law scripts tally occurrences of words in text files.
+## Contributors
+
+- Niko Bertrand
When we try to merge docs into main,
Git doesn’t know which of these changes to keep:
$ git merge docs main
Depending on whether or not automatic merging failes or is successfull you will get either of the following returns:
MERGE SUCCESS
Auto-merging zipf/README.md
Merge made by the 'ort' strategy.
 zipf/README.md | 2 ++
 1 file changed, 2 insertions(+)
MERGE FAIL:
Auto-merging README.md
CONFLICT (content): Merge conflict in README.md
Automatic merge failed; fix conflicts and then commit the result.
If we look in README.md,
we see that Git has kept both sets of changes,
but has marked which came from where:
$ cat README.md
# # RSE tutorial - Zipf!

<<<<<<< HEAD
## Contributors

- Niko Bertrand
=======
These Zipf's Law scripts tally the occurrences of words in text files.
>>>>>>> docs
The lines from <<<<<<< HEAD to ======= are what was in master,
while the lines from there to >>>>>>> docs show what was in docs.
If there were several conflicting regions in the same file,
Git would mark each one this way.
We have to decide what to do next: keep the main changes,
keep those from docs, edit this part of the file to combine them,
or write something new. Whatever we do, we must remove the >>>, ===, and <<< markers. Let’s combine the two sets of changes so the resulting file reads:
# RSE tutorial - Zipf!

These Zipf's Law scripts tally the occurrences of words in text files.

In this folder you find the necessary data and scripts used in the RSE-UP book that can be found [here](https://se-up.github.io/RSE-UP/chapters/welcome.html).

## Contributors
- Niko Bertrand
We can now add the file and commit the change, just as we would after any other edit:
$ git add README.md
$ git commit -m "docs: resolve merge conflict and combine README additions"
[main 55c63d0] docs: resolve merge conflict and combine README additions
Our branch’s history now shows a single sequence of commits, with the master changes on top of the earlier docs changes:
$ git log --oneline -n 4
55c63d0 (HEAD -> main) docs: resolve merge conflict and combine README additions
45a576b docs: add Contributors section with initial contributor to README
a0b88e5 (docs) docs: add repository overview to README
232b564 docs: add initial README file with project title
If we want to see what really happened, we can add the --graph option to git log:
$ git log --oneline --graph -n 4
*   b6954e8 (HEAD -> main) Merge branch 'docs' merge conflict test
|\
| * 0b72d0e (docs) docs: add Zipf's Law script description to README
* | 885a8c7 docs: add Contributors section with initial contributor to README
|/
*   5df6f8f (origin/main, origin/HEAD) Merge branch 'new_feature'
|\
At this point we can delete the docs branch:
$ git branch -d docs
Deleted branch docs (was a0b88e5).
Alternatively, we can keep using docs for documentation updates.
Each time we switch to it, we merge changes from main into docs,
do our editing (while switching back to main or other branches as needed
to work on the code), and then merge from docs to main once the documentation is updated.
Remember to Push
If you are using a remote repository, don’t forget to use
git pushto keep your version on GitHub up to date with your local version.
A Branch-Based Workflow#
What is the best way to incorporate branching into our regular coding practice? If we are working on our own computer, this workflow will help us keep track of what we are doing:
git checkout mainto make sure we are in themainbranch.git checkout -b name-of-featureto create a new branch. We always create a branch when making changes, since we never know what else might come up. The branch name should be as descriptive as a variable name or filename would be.Make our changes. If something occurs to us along the way—for example, if we are writing a new function and realize that the documentation for some other function should be updated—we do not do that work in this branch just because we happen to be there. Instead, we commit our changes, switch back to
main, and create a new branch for the other work.When the new feature is complete, we
git merge main name-of-featureto get any changes we merged intomainafter creatingname-of-featureand resolve any conflicts. This is an important step: we want to do the merge and test that everything still works in our feature branch, not inmain.Finally, we switch back to
mainandgit merge name-of-feature mainto merge our changes intomain. We should not have any conflicts, and all of our tests should pass.
Most experienced developers use this branch-per-feature workflow, but what exactly is a “feature”? These rules make sense for small projects:
Anything cosmetic that is only one or two lines long can be done in
mainand committed right away. Here, “cosmetic” means changes to comments or documentation: nothing that affects how code runs, not even a simple variable renaming.A pure addition that doesn’t change anything else is a feature and goes into a branch. For example, if we run a new analysis and save the results, that should be done on its own branch because it might take several tries to get the analysis to run, and we might interrupt ourselves to fix things that we discover aren’t working.
Every change to code that someone might want to undo later in one step is a feature. For example, if a new parameter is added to a function, then every call to the function has to be updated. Since neither alteration makes sense without the other, those changes are considered a single feature and should be done in one branch.
The hardest thing about using a branch-per-feature workflow is sticking to it for small changes. As the first point in the list above suggests, most people are pragmatic about this on small projects; on large ones, where dozens of people might be committing, even the smallest and most innocuous change needs to be in its own branch so that it can be reviewed (which we discuss below).
Using Other People’s Work#
NOTE the following instructions are created using the University of Potsdam Gitlab server. Non University Members, while having access, cannot contribute or fork. For instructions on how this works on Github please click here. Instructions will be similar, furthermore, they will use the original material from the Research Software Engineering with Python book by Irving.
So far we have used Git to manage individual work, but it really comes into its own when we are working with other people. We can do this in two ways:
Everyone has read and write access to a single shared repository.
Everyone can read from the project’s main repository, but only a few people can commit changes to it. The project’s other contributors fork the main repository to create one that they own, do their work in that, and then submit their changes to the main repository.
The first approach works well for teams of up to half a dozen people who are all comfortable using Git, but if the project is larger, or if contributors are worried that they might make a mess in the main branch, the second approach is safer.
Git itself doesn’t have any notion of a “main repository”, but like Github, Gitlab, Bitbucket or selfhosted solutions like Gitea all encourage people to use Git in ways that effectively create one.
Suppose, for example, that you want to contribute to the Zipf’s Law code that we are hosting on Gitlab at https://gitup.uni-potsdam.de/seg/rse_course/zipf.
You can go to that URL and click on the “Fork” button in the upper right corner (Figure: fork button).

Fig. 11 Gitlab git fork button#
While Github immediately creates a copy of a repository, on the university gitlab server you will have a choice at the next step, whether or not the repository is private, internal or public.
Public means that everyone, even non university members will be able to view the repository. Internal means that anybody that is logged in with their University of Potsdam account is able to view and interact with the repository. And private means that only you have access.
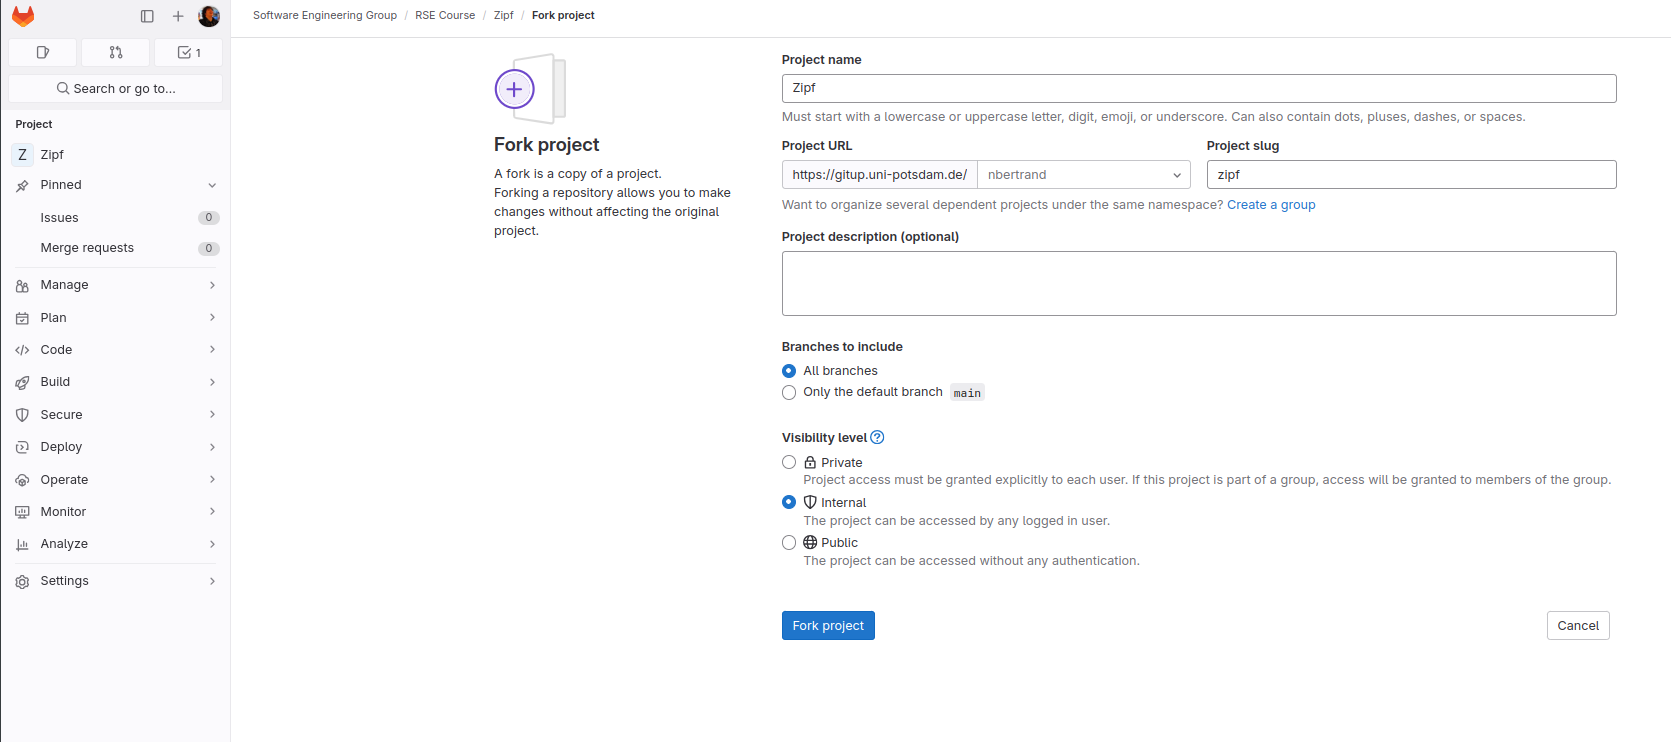
Fig. 12 Gitlab git fork settings#
After clicking the fork button at the bottom the process should complete with your chosen project settings
When the command completes, the setup on Gitlab now looks like Figure: after fork. Nothing has happened yet on your own machine: the new repository exists only on Github. When you explores its history, they see that it contains all of the changes we made.
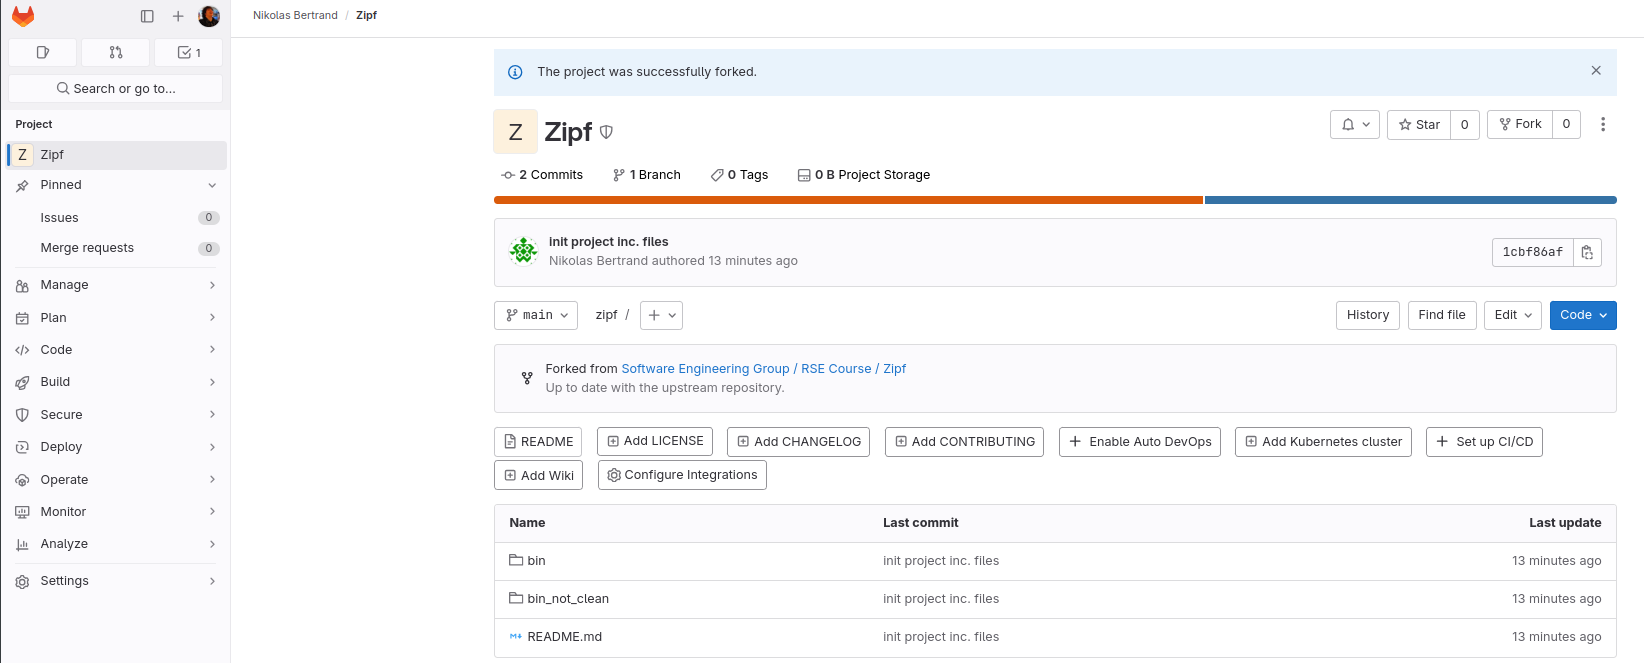
Fig. 13 Gitlab git: After Fork#
A copy of a repository is called a clone In order to start working on the project, Sami needs a clone of their repository (not Amira’s) on their own computer. We will modify your prompt to include their desktop user ID (your user name
and working directory (initially ~) to make it easier to follow what’s happening:
$ git clone git@gitup.uni-potsdam.de:YOUR_USERNAME/zipf.git
Cloning into 'zipf'...
remote: Enumerating objects: 64, done.
remote: Counting objects: 100% (64/64), done.
remote: Compressing objects: 100% (43/43), done.
remote: Total 64 (delta 20), reused 63 (delta 19), pack-reused 0
Receiving objects: 100% (64/64), 2.20 MiB | 2.66 MiB/s, done.
Resolving deltas: 100% (20/20), done.
This command creates a new directory with the same name as the project,
i.e., zipf. When Sami goes into this directory and runs ls and git log,
they see that all of the project’s files and history are there:
$ cd zipf
$ ls
README.md bin data results
$ git log --oneline -n 4
55c63d0 (HEAD -> main, origin/main, origin/HEAD)
        docs: resolve merge conflict and combine README additions
45a576b docs: add Contributors section with initial contributor to README
a0b88e5 docs: add repository overview to README
232b564 docs: add initial README file with project title
You can also see that Git has automatically created a remote for their repository that points back at their repository on Gitlab:
$ git remote -v
origin  git@gitup.uni-potsdam.de:YOUR_NAME/zipf.git (fetch)
origin  git@gitup.uni-potsdam.de:YOUR_NAME/zipf.git (push)
You can pull changes from your fork and push work back there, but you need to do one more thing before getting the changes from our repository:
$ git remote add upstream  https://gitup.uni-potsdam.de/seg/rse_course/zipf.git
$ git remote -v
origin      https://github.com/YOUR_USERNAME/zipf.git (fetch)
origin      https://github.com/YOUR_USERNAME/zipf.git (push)
upstream    https://gitup.uni-potsdam.de/seg/rse_course/zipf.git (fetch)
upstream    https://gitup.uni-potsdam.de/seg/rse_course/zipf.git (push)
In this example we have called the new remote upstream because it points at the repository
from which the fork is derived. You could use any name, but upstream is a nearly universal convention.
With this remote in place, you are finally set up. Suppose, for example, that we habe modified the project’s README.md file to add you as a contributor.:
## Contributors

- YOU
We commit the changes and push them to our repository on Gitlab:
$ git commit -a -m "docs: add yourself to Contributors section in README"
[main 35fca86] docs: add yourself to Contributors section in README
 1 file changed, 1 insertion(+)
$ git push origin main
Enumerating objects: 5, done.
Counting objects: 100% (5/5), done.
Delta compression using up to 4 threads
Compressing objects: 100% (3/3), done.
Writing objects: 100% (3/3), 315 bytes | 315.00 KiB/s, done.
Total 3 (delta 2), reused 0 (delta 0), pack-reused 0
remote: Resolving deltas: 100% (2/2), completed with 2 local
        objects.
To https://gitup.uni-potsdam.de/seg/rse_course/zipf.git
   55c63d0..35fca86  main -> main
Our changes are now on our desktop and in our Gitlab repository but not in either of your repositories (local or remote). Since you created a remote that points at our Gitlab repository, though, you can easily pull those changes to your local version:
$ git pull upstream main
From https://gitup.uni-potsdam.de/seg/rse_course/zipf
 * branch            main     -> FETCH_HEAD
 * [new branch]      main     -> upstream/master
Updating 55c63d0..35fca86
Fast-forward
 README.md | 1 +
 1 file changed, 1 insertion(+)
Pulling from a repository owned by someone else is no different than pulling from a repository we own. In either case, Git merges the changes and asks us to resolve any conflicts that arise.
The only significant difference is that, as with git push and git pull,
we have to specify both a remote and a branch:
in this case, upstream and main.
Pull Requests#
You can now get our work, but how can we get yours? We could create a remote that pointed at your repository on Gitlab and periodically pull in your changes, but that would lead to chaos, since we could never be sure that everyone’s work was in any one place at the same time. Instead, almost everyone uses pull requests. They aren’t part of Git itself, but are supported by all major online forges.
A pull request is essentially a note saying, “Someone would like to merge branch A of repository B into branch X of repository Y.” The pull request does not contain the changes, but instead points at two particular branches. That way, the difference displayed is always up to date if either branch changes.
But a pull request can store more than just the source and destination branches: it can also store comments people have made about the proposed merge. Users can comment on the pull request as a whole, or on particular lines, and mark comments as out of date if the author of the pull request updates the code that the comment is attached to. Complex changes can go through several rounds of review and revision before being merged, which makes pull requests the review system we all wish journals actually had.
To see this in action, suppose you want to add your email address to the README.md. You create a new branch and switch to it:
$ git checkout -b adding-email
Switched to a new branch 'adding-email'
then make a change and commit it:
$ git commit -a -m "docs: add email address to Contributors section in README"
[adding-email 3e73dc0] docs: add email address to Contributors section in README
 1 file changed, 1 insertion(+), 1 deletion(-)
$ git diff HEAD~1
diff --git a/README.md b/README.md
index e8281ee..e1bf630 100644
--- a/README.md
+++ b/README.md
@@ -6,4 +6,4 @@ and plot each word's rank versus its frequency.
 ## Contributors

-- You
+- You <yourEMAIL@zipf.org>
Your changes are only in your local repository. You cannot create a pull request until those changes are on Gitlab, so you push your new branch to your repository on Gitlab:
$ git push --set-upstream origin adding-email
Enumerating objects: 5, done.
Counting objects: 100% (5/5), done.
Delta compression using up to 4 threads
Compressing objects: 100% (3/3), done.
Writing objects: 100% (3/3), 315 bytes | 315.00 KiB/s, done.
Total 3 (delta 2), reused 0 (delta 0), pack-reused 0
remote: Resolving deltas: 100% (2/2), completed with 2 local
  objects.
remote:
remote: Create a pull request for 'adding-email' on GitHub by
  visiting:
  https://gitup.uni-potsdam.de/nbertrand/zipf
remote:
https://gitup.uni-potsdam.de/nbertrand/zipf
 * [new branch]      adding-email -> adding-email
When you go to your Gitlab repository in the browser, Gitlab notices that they have just pushed a new branch and asks them if they want to create a merge request (Figure: after push). (On Github this is called a pull request)
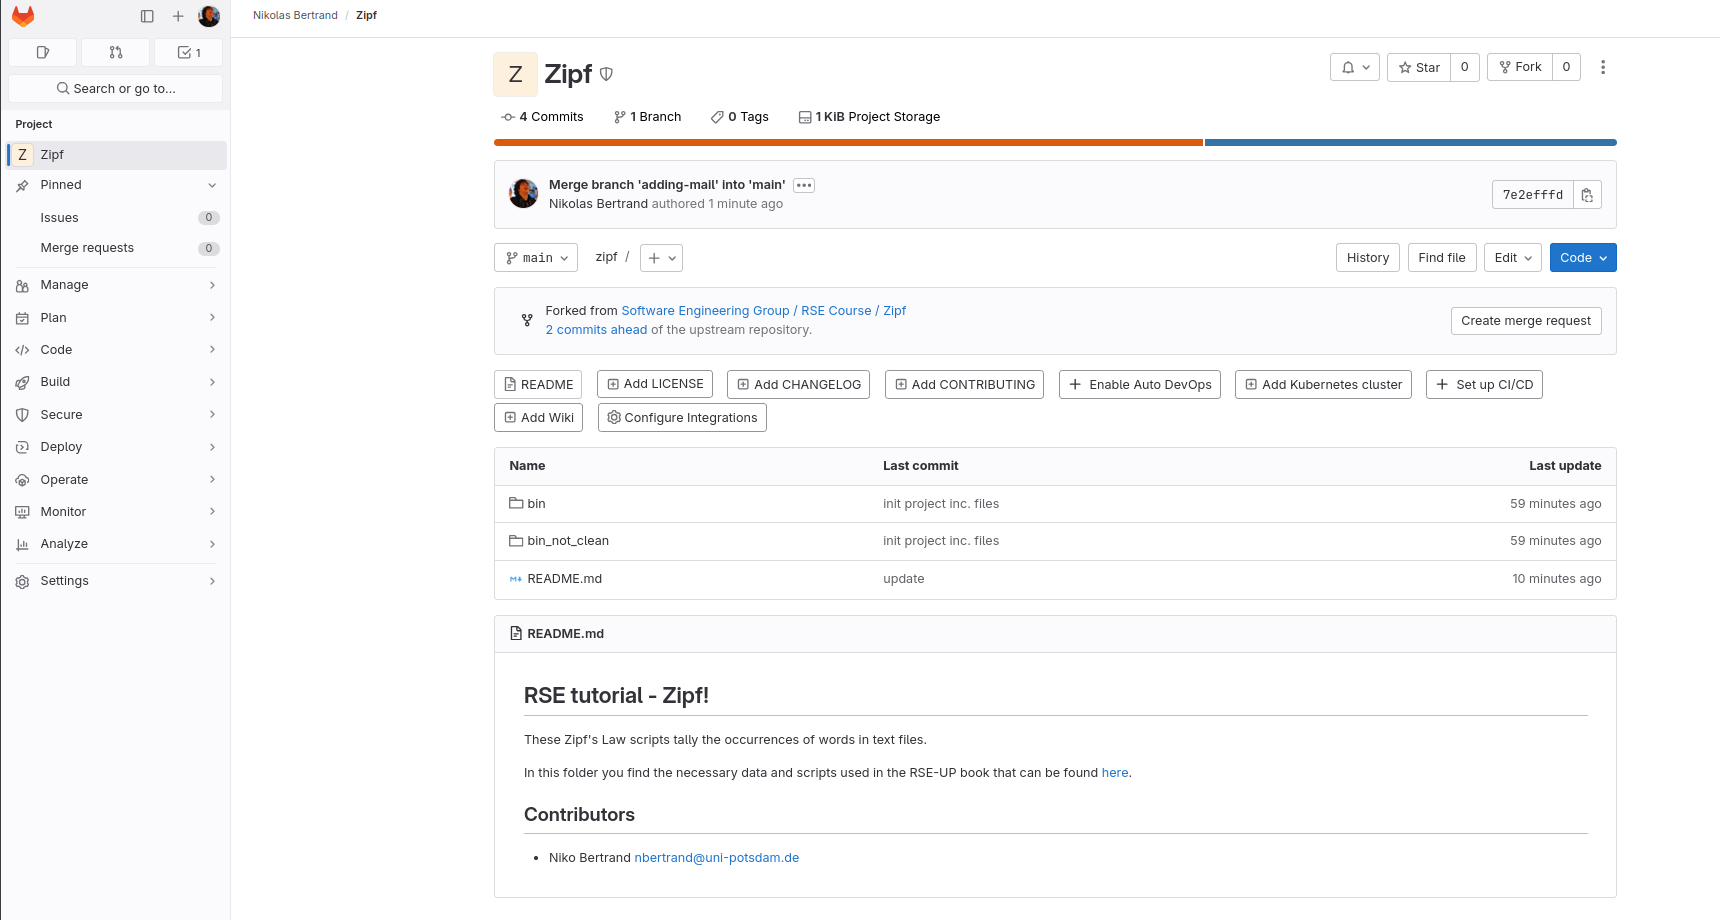
Fig. 14 Git after Push#
When you click on the button, Gitlab displays a page showing the default source and destination of the merge request and a pair of editable boxes for the pull request’s title and a longer comment (Figure: merge request start).
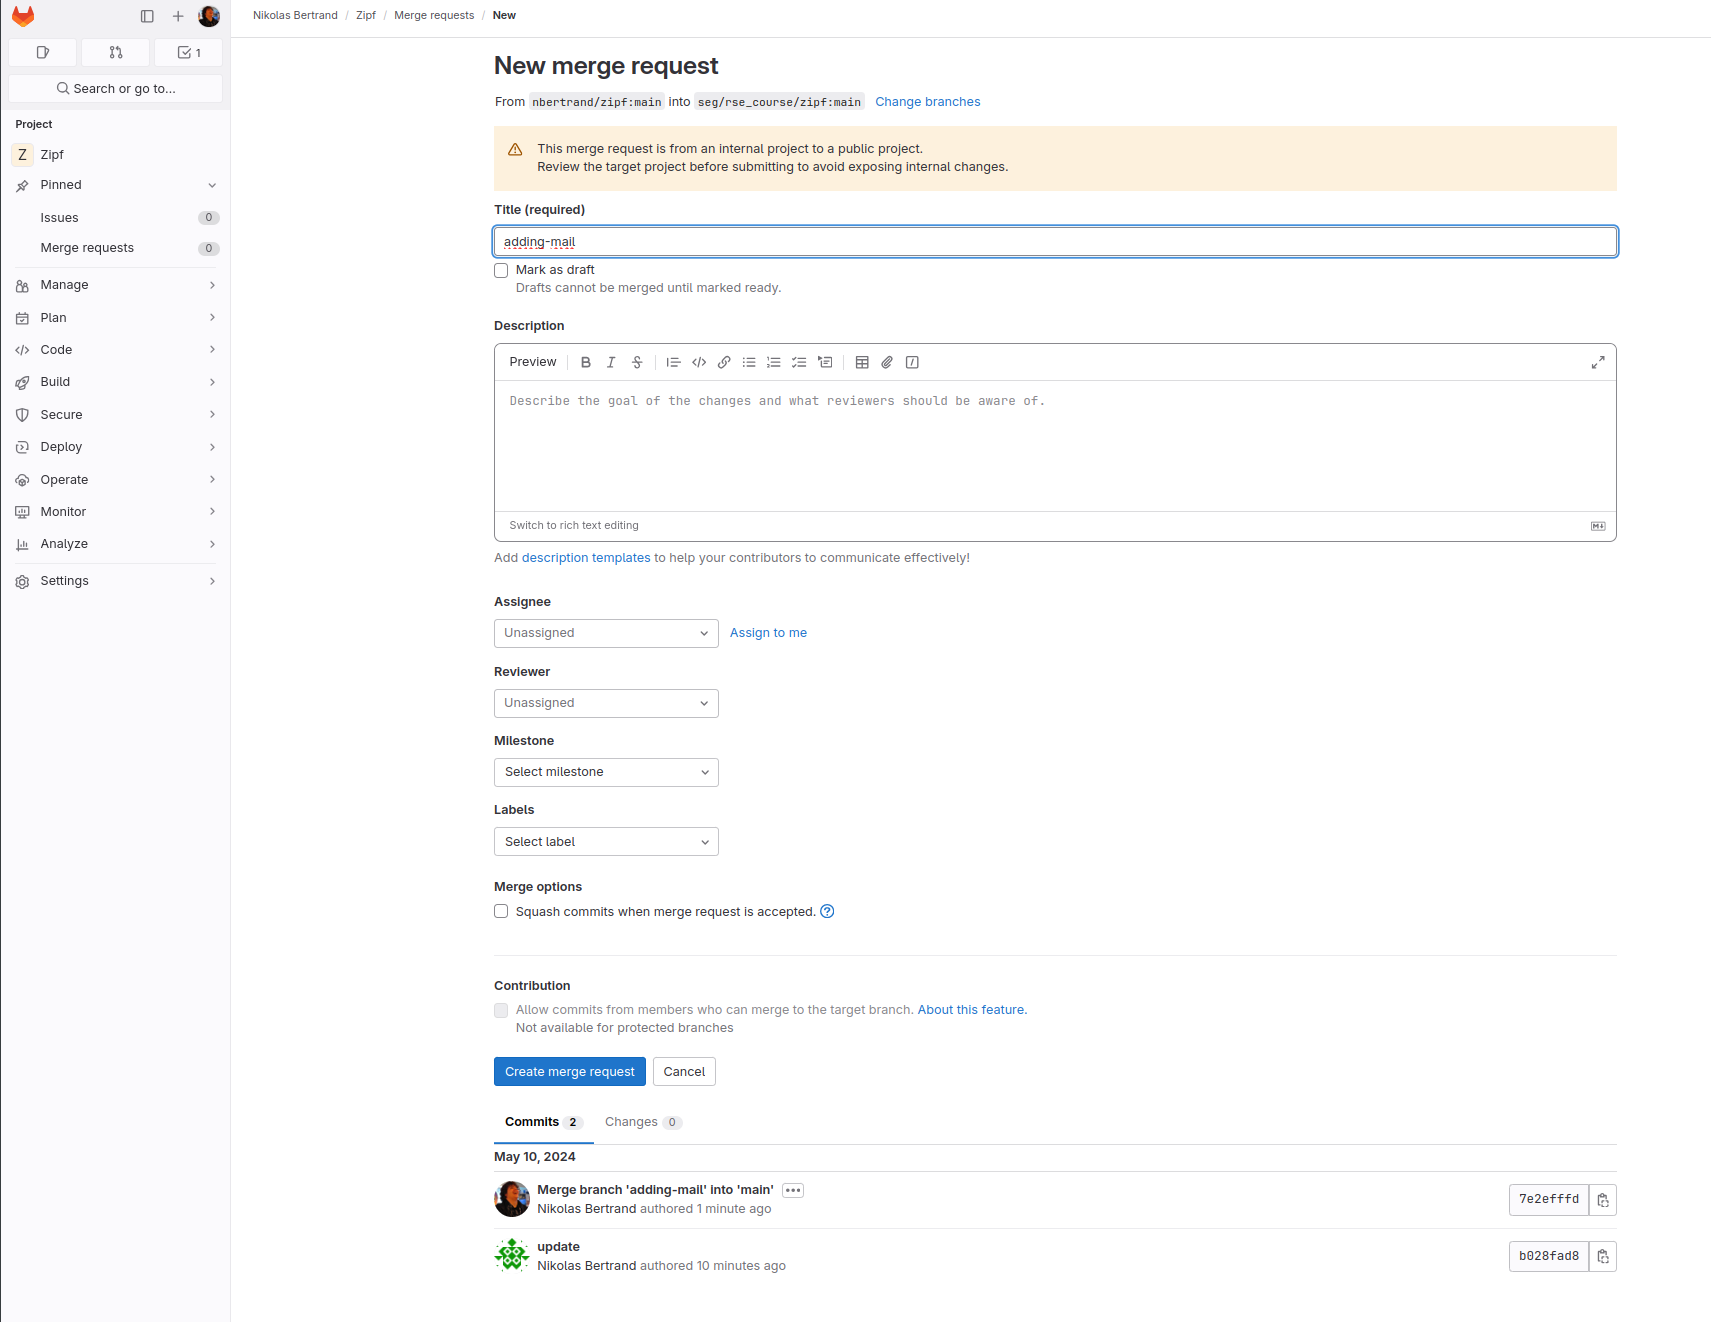
Fig. 15 Start a merge request#
If you click on the changes tab, you can see a summary of the changes that will be in the merge request (Figure: merge request summary).
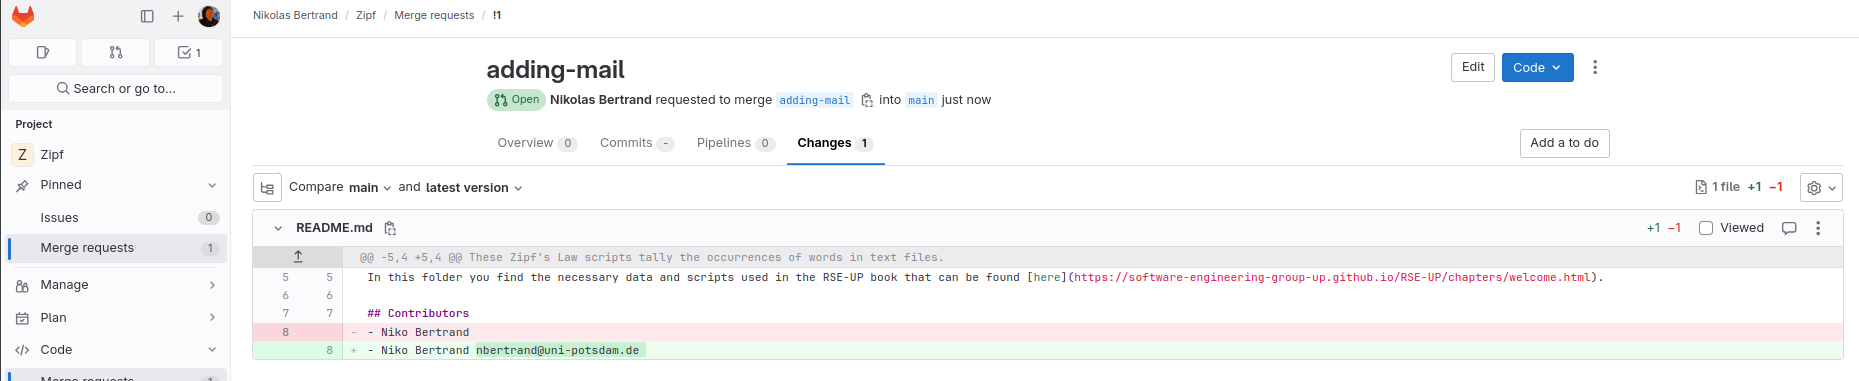
Fig. 16 Git merge request summary#
The top (title) box is autofilled with the previous commit message, so you add an extended explanation to provide additional context before clicking on “Create Merge Request”
(Figure: fill in merge request). When they do, Gitlab displays a page showing the new merge request, which has a unique serial number (Figure: New merge request). Note that this merge request is displayed in our repository rather than yours, since it is our repository that will be affected if the merge request is merged.
On the left sidebar we can see that there is a new merge request, when clicking on it a list of merge requests will be opened.

Fig. 17 Git pull request list#
Next we need to approve that request:
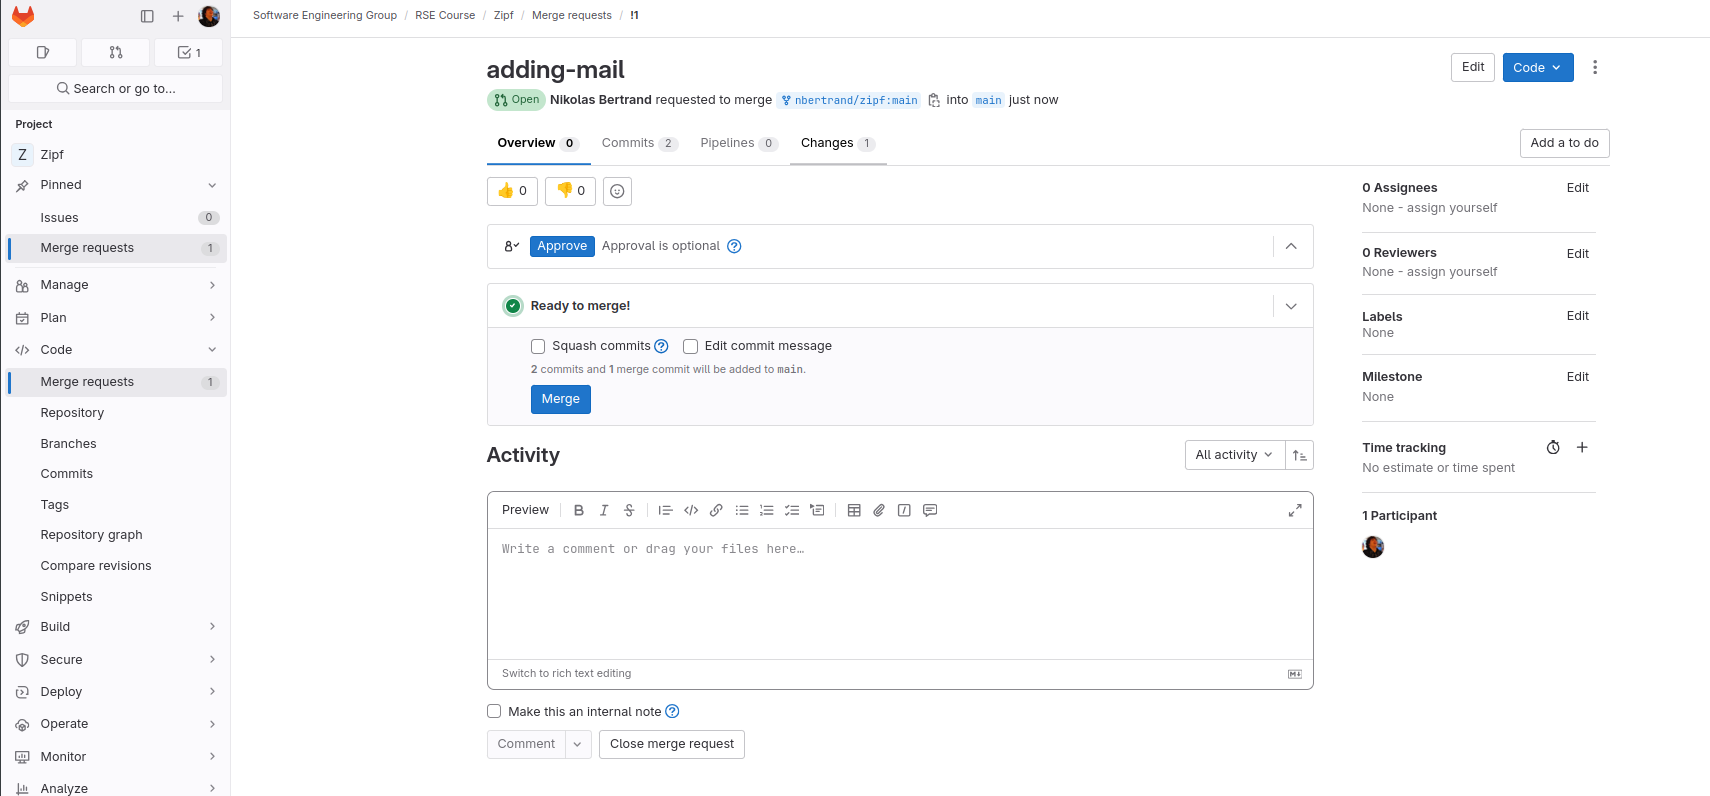
Fig. 18 Gitlab Merge request approval#
Since there are no conflicts, Gitlab will let us merge the merge request immediately using the “Merge merge request” button. We could also discard or reject it without merging using the “Close merge request” button. Instead, we could also click on the “Files changed” tab to see what you have changed (Figure: Merge request - request changes).
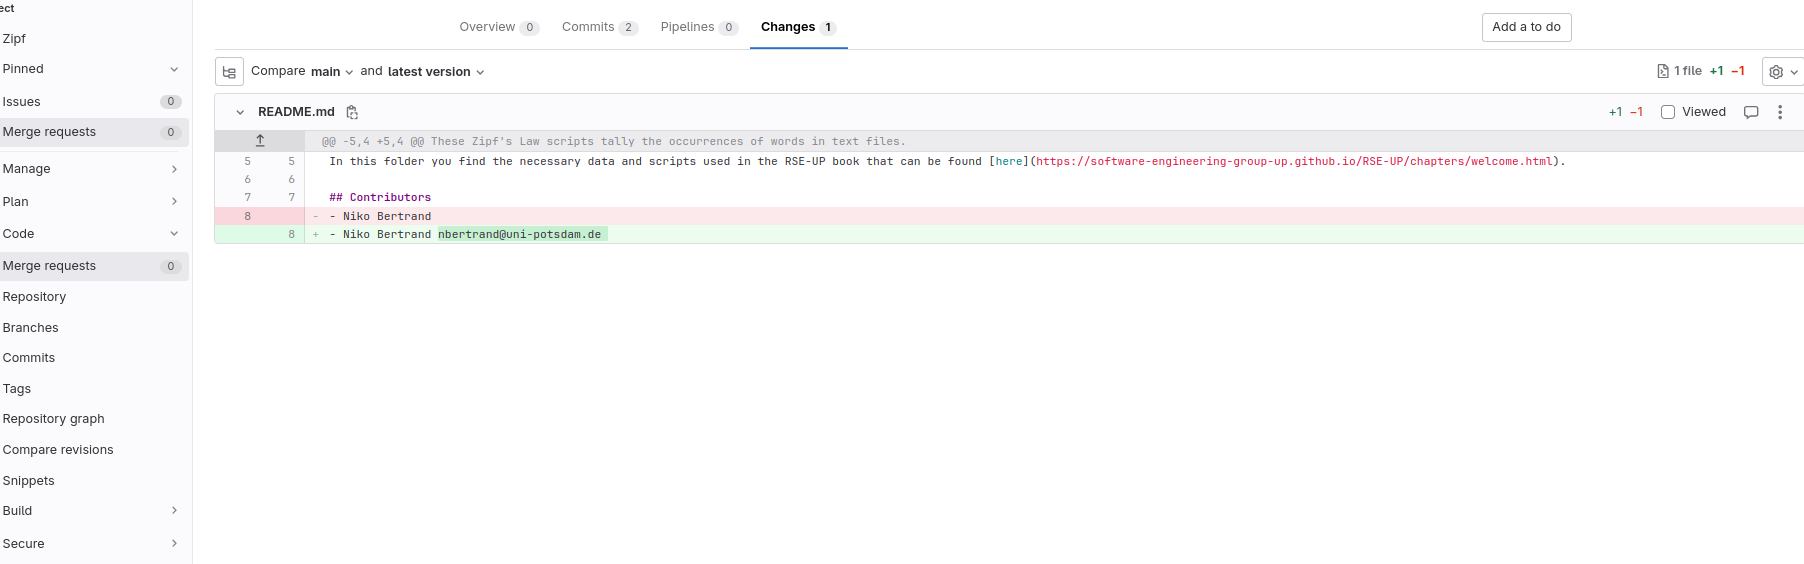
Fig. 19 Gitlab view changes#
If we move our mouse over particular lines, a comment symbol appears near the numbers to indicate that we can add comments (Figure: Merge request - comment marker). We click on the marker beside our own name and write a comment. These comments will then be inserted and automatically displayed.
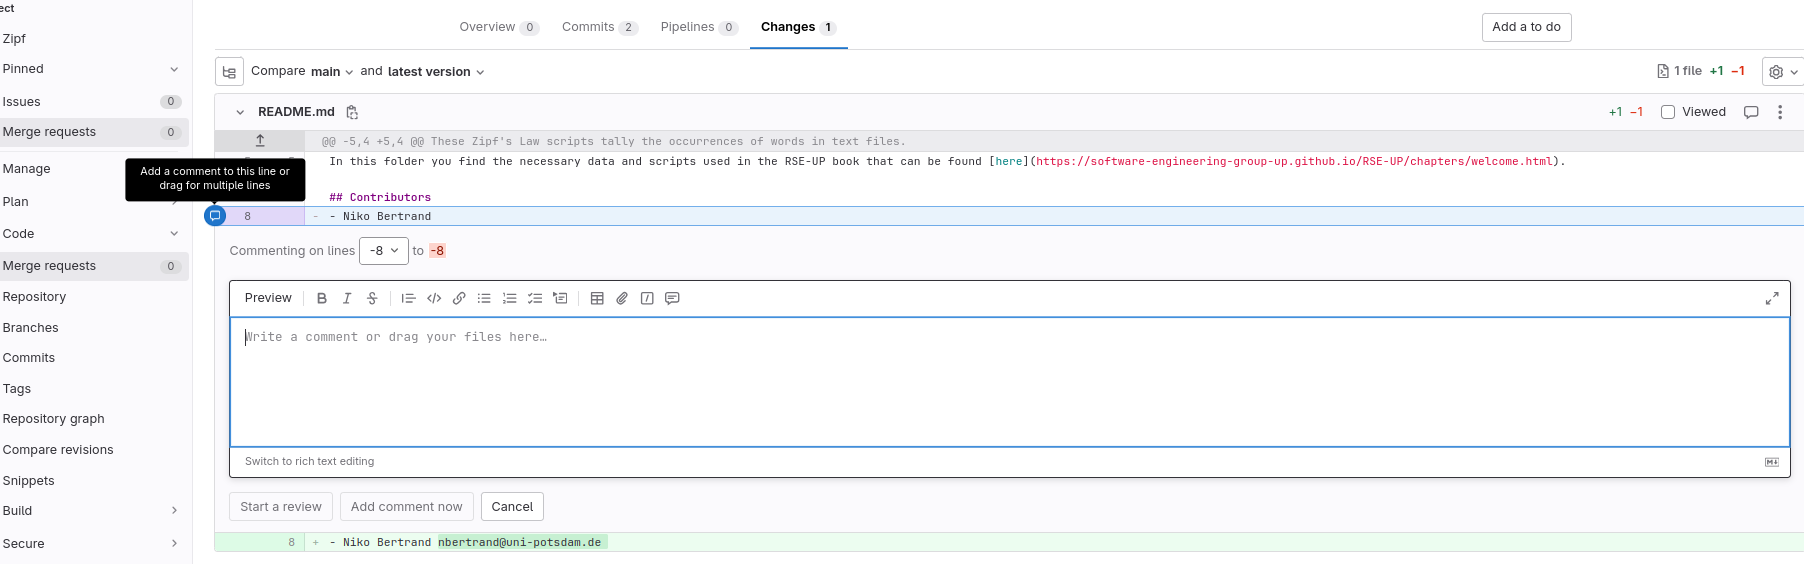
Fig. 20 Add comments to changes.#
While we are working, Gitlab has been emailing notifications to us and you. When you click on the link in the email notification, it takes you to the PR and shows our comment. Your changes README.md, commits, and pushes, but does not create a new merge request or do anything to the existing one.
As explained above, a merge request is a note asking that two branches be merged, so if either end of the merge changes, the merge updates automatically.
Depending on the comment, you either need to create a fix or explain further what your change does. After this has been done we can approve the merge request and merge it.
Fig. 21 Successful merge#
To get those changes from Gitlab to our local repository,
we uses git pull:
$ git pull origin main
From https://gitup.uni-potsdam.de/seg/rse_course/zipf.git
 * branch            main     -> FETCH_HEAD
Updating 35fca86..a04e3b9
Fast-forward
 README.md | 4 ++--
 1 file changed, 2 insertions(+), 2 deletions(-)
To get the changes we just made from your adding-email branch into our main branch, you could use git merge on the command line. It’s a little clearer, though, if you also use git pull from your upstream repository (our repository) so that you can be sure to get any other changes that we may have merged:
$ git checkout main
Switched to branch 'main'
Your branch is up to date with 'origin/main'.
$ git pull upstream main
From https://gitup.uni-potsdam.de/seg/rse_course/zipf.git
 * branch            main     -> FETCH_HEAD
Updating 35fca86..a04e3b9
Fast-forward
 README.md | 4 ++--
 1 file changed, 2 insertions(+), 2 deletions(-)
Finally, you can push your changes back to the main branch
in your own remote repository:
$ git push origin main
Total 0 (delta 0), reused 0 (delta 0), pack-reused 0
To https://gitup.uni-potsdam.de/YOUR_NAME/zipf.git
   35fca86..a04e3b9  main -> main
All four repositories are now synchronized.
Handling Conflicts in Pull Requests#
Finally, suppose that Amira and you have decided to collaborate more extensively on this project. Amira has added you as a collaborator to the Github repository. Now you can make contributions directly to the repository, rather than via a pull request from a forked repository.
You make a change to README.md in the main branch on Github.
Meanwhile, Amira is making a conflicting change to the same file in a different branch. When Amira creates her pull request, Github will detect the conflict and report that the PR cannot be merged automatically.
We can solve this problem with the tools we already have.
If you have made your changes in a branch called editing-readme, the steps are:
Pull your changes from the
mainbranch of the Gitlab repository into themainbranch of your local repository.Merge from the
mainbranch of your local repository to theediting-readmebranch in the same repository.Push your updated
editing-readmebranch to your repository on Gitlab. The merge request from there back to themainbranch of the main repository will update automatically.
Github and other forges do allow people to merge conflicts through their browser-based interfaces, but doing it on our desktop means we can use our favorite editor to resolve the conflict. It also means that if the change affects the project’s code, we can run everything to make sure it still works.
But what if Sami or someone else merges another change while Amira is resolving this one, so that by the time she pushes to her repository there is another, different, conflict? In theory this cycle could go on forever; in practice, it reveals a communication problem that Amira (or someone) needs to address. If two or more people are constantly making incompatible changes to the same files, they should discuss who’s supposed to be doing what, or rearrange the project’s contents so that they aren’t stepping on each other’s toes.
Summary#
Branches and pull requests seem complicated at first, but they quickly become second nature. Everyone involved in the project can work at their own pace on what they want to, picking up others’ changes and submitting their own whenever they want. More importantly, this workflow gives everyone has a chance to review each other’s work. As we discuss in Section Checking style, doing reviews doesn’t just prevent errors from creeping in: it is also an effective way to spread understanding and skills.
Keypoints#
Use a branch-per-feature workflow to develop new features while leaving the master branch in working order.
git branchcreates a new branch.git checkoutswitches between branches.git mergemerges changes from another branch into the current branch.Conflicts occur when files or parts of files are changed in different ways on different branches.
Version control systems do not allow people to overwrite changes silently; instead, they highlight conflicts that need to be resolved.
Forking a repository makes a copy of it on a server.
Cloning a repository with
git clonecreates a local copy of a remote repository.Create a remote called
upstreamto point to the repository a fork was derived from.Create pull requests to submit changes from your fork to the upstream repository.