Using Git at the Command Line#
To show how Git works, we will apply it to the Zipf’s Law project.
We’ll be working with zipf project (found here), which should contain the following files:
Use the instructions below as guideline rather than a 1:1 copy paste exercise
zipf/
├── bin_pycodestyle
│   ├── ...
├── data
│   ├── dracula.txt
│   ├── frankenstein.txt
│   └── ...
└── ...
Throughout this chapter we also show the equivalent Git steps for the German AQI Analyzer project,
which we introduced in Chapter Getting Started.
The AQI project is located in a directory called german-air-quality-index-analyzer
Setting Up#
We write Git commands as git verb options,
where the subcommand verb tells Git what we want to do
and options provide whatever additional information that subcommand needs.
Using this syntax, the first thing we need to do is configure Git.
$ git config --global user.name "FIRST- LAST-NAME"
$ git config --global user.email "EMAIL@EMAIL.org"
(Please use your own name and email address instead of the one shown.)
Here, config is the verb
and the rest of the command are options.
We put the name in quotation marks because it contains a space;
we don’t actually need to quote the email address,
but do so for consistency.
Since we are going to be using GitHub,
the email address should be the same as you have or intend to use
when setting up your GitHub account.
The --global option tells Git to use the settings for all of our projects on this computer,
so these two commands only need to be run once.
However,
we can re-run them any time if we want to change our details.
We can also check our settings using the --list option:
$ git config --list
user.name=Your Name
user.email=email@EMAIL.org
core.autocrlf=input
core.editor=nano
core.repositoryformatversion=0
core.filemode=true
core.bare=false
core.ignorecase=true
...
Depending on your operating system and version of Git, your configuration list may look a bit different. Most of these differences shouldn’t matter right now, as long as your username and email are accurate.
Git Help and Manual
If we forget a Git command, we can list which ones are available using
--help:$ git --helpThis option also gives us more information about specific commands:
$ git config --help
Creating a New Repository#
Once Git is configured, we can use it to track work on our Zipf’s Law project. Let’s make sure we are in the top-level directory of our project:
$ cd ~/zipf
$ ls
bin_pycodestyle data
We want to make this directory a repository i.e.,
a place where Git can store versions of our files.
We do this using the init command with . to mean “the current directory”:
$ git init .
Initialized empty Git repository in /Users/YOU/zipf/.git/
ls seems to show that nothing has changed:
$ ls
bin_pycodestyle data
but if we add the -a flag to show everything, we can see that Git has created a hidden directory within zipf called .git:
$ ls -a
. .. .git bin_pycodestyle data
Git stores information about the project in this special subdirectory. If we ever delete it, we will lose that history.
AQI Project: Initializing a Repository
We apply the same steps to the AQI project:
$ cd ~/german-air-quality-index-analyzer
$ git init .
Initialized empty Git repository in /Users/YOU/german-air-quality-index-analyzer/.git/
We can check that everything is set up correctly by asking Git to tell us the status of our project:
$ git status
On branch main

No commits yet

Untracked files:
  (use "git add <file>..." to include in what will be
  committed)

        bin_pycodestyle/
        data/

nothing added to commit but untracked files
present (use "git add" to track)
“No commits yet” means that Git hasn’t recorded any history yet, while “Untracked files” means Git has noticed that
there are things in bin/, data/ and results/ that it is not yet keeping track of.
Adding Existing Work#
Now that our project is a repository, we can tell Git to start recording its history.
To do this, we add things to the list of things Git is tracking using git add.
We can do this for single files:
$ git add bin_pycodestyle/wordcount.py
or entire directories:
$ git add bin_pycodestyle
The easiest thing to do with an existing project
is to tell Git to add everything in the current directory using .:
$ git add .
We can then check the repository’s status to see what files have been added:
$ git status
On branch main

No commits yet

Changes to be committed:
  (use "git rm --cached <file>..." to unstage)
	  new file:   bin_pycodestyle
	  new file:   bin_pycodestyle/countwords.py
	  new file:   bin_pycodestyle/plotcounts.py
	  new file:   data/dracula.txt
	  new file:   data/frankenstein.txt
	  new file:   data/jane_eyre.txt
	  new file:   data/moby_dick.txt
	  new file:   data/sense_and_sensibility.txt
	  new file:   data/sherlock_holmes.txt
	  new file:   data/time_machine.txt
Adding all of our existing files this way is easy, but we can accidentally add things that should never be in version control,
such as files containing passwords or other sensitive information.
The output of git status tells us that we can remove such files from the list of things to be saved using git rm --cached; we will practice this in Exercise on removing files
What to Save
We always want to save programs, manuscripts, and everything else we have created by hand in version control. In this project, we have also chosen to save our data files and the results we have generated (including our plots). This is a project-specific decision: if these files are very large, for example, we may decide to save them elsewhere, while if they are easy to re-create, we may not save them at all. We will explore this issue further in Chapter @ref(provenance).
We no longer have any untracked files,
but the tracked files haven’t been committed (i.e., saved permanently in our project’s history). We can do this using git commit:
$ git commit -m "feat: Add scripts, novels, word counts, and plots"
[master (root-commit) 173222b] feat: add scripts, novels, word
    counts, and plots
 18 files changed, 145296 insertions(+)
 create mode 100644 bin_pycodestyle/countwords.py
 create mode 100644 bin_pycodestyle/plotcounts.py
 create mode 100644 data/dracula.txt
 create mode 100644 data/frankenstein.txt
 create mode 100644 data/jane_eyre.txt
 create mode 100644 data/moby_dick.txt
 create mode 100644 data/sense_and_sensibility.txt
 create mode 100644 data/sherlock_holmes.txt
 create mode 100644 data/time_machine.txt
 create mode 100644 results/dracula.csv
 create mode 100644 results/jane_eyre.csv
 create mode 100644 results/jane_eyre.png
 create mode 100644 results/moby_dick.csv
For the AQI project, all files are already in place from when we set up the project structure. We add everything at once and check the status:
$ git add .
$ git status
On branch main

No commits yet

Changes to be committed:
  (use "git rm --cached <file>..." to unstage)
        new file:   .gitignore
        new file:   CITATION.cff
        new file:   CONDUCT.md
        new file:   CONTRIBUTING.md
        new file:   LICENSE
        new file:   README.md
        new file:   Makefile
        new file:   pyproject.toml
        new file:   requirements.txt
        new file:   src/aqi_calculator.py
        new file:   src/aqi_thresholds.py
        new file:   tests/test_aqi_calculator.py
        new file:   notebooks/computational_narrative.ipynb
We commit this as the starting point of the project’s history:
$ git commit -m "feat: add initial project structure and source files"
[main (root-commit) a1b2c3d] feat: add initial project structure and source files
 13 files changed, 500 insertions(+)
 create mode 100644 .gitignore
 create mode 100644 CITATION.cff
 create mode 100644 CONDUCT.md
 create mode 100644 CONTRIBUTING.md
 create mode 100644 LICENSE
 create mode 100644 README.md
 create mode 100644 Makefile
 create mode 100644 pyproject.toml
 create mode 100644 requirements.txt
 create mode 100644 src/aqi_calculator.py
 create mode 100644 src/aqi_thresholds.py
 create mode 100644 tests/test_aqi_calculator.py
 create mode 100644 notebooks/computational_narrative.ipynb
git commit takes everything we have told Git to save using git add and stores a copy permanently inside the repository’s .git directory.
This permanent copy is called a commit or a revision. Git gives is a unique identifier, and the first line of output from git commit displays
its short identifier 2dc78f0, which is the first few characters of that unique label.
We use the -m option (short for message) to record a short comment with the commit to remind us later what we did and why.
(Once again, we put it in double quotes because it contains spaces.) If we run git status now:
$ git status
the output tells us that all of our existing work is tracked and up to date:
On branch main
nothing to commit, working tree clean
This first commit becomes the starting point of our project’s history: we won’t be able to see changes made before this point. This implies that we should make our project a Git repository as soon as we create it rather than after we have done some work.
Describing Commits#
When we use -m, we are only writing the subject line; this makes things easier in the short run, but if our project’s history fills up with one-liners like “fixed problem” or “updated”, our future self will wish that we had taken a few extra seconds to explain things in a little more detail.
We follow the Conventional Commits standard, which we cover in detail in the commit messages chapter. In short, every commit message should look like:
<type>: <short description>
Where type is one of feat, fix, docs, chore, test, refactor, and the description is lowercase and concise.
A longer body explaining what and why can be added after a blank line.
Which Editor?
The default editor in the Unix shell is called Vim. It has many useful features, but no one has ever claimed that its interface is intuitive. (“How do I exit the Vim editor?” is one of the most frequently read questions on Stack Overflow.)
To configure Git to use the
nanoeditor introduced in Chapter bash-basics instead, execute the following command:$ git config --global core.editor "nano -w"
Saving and Tracking Changes#
Our initial commit gave us a starting point. The process to build on top of it is similar: first add the file, then commit changes. Let’s check that we’re in the right directory:
$ pwd
/Users/YOU/zipf
Let us create a new file and add something to it:
touch hello.txt
echo "hello" > hello.txt
If we check the status of our repository again, Git tells us that we have a new file:
$ git status
On branch main
Untracked files:
  (use "git add <file>..." to include in what will be
  committed)
    hello.txt

nothing added to commit but untracked files
present (use "git add" to track)
Git isn’t tracking this file yet because we haven’t told it to.
Let’s do that with git add and then commit our change:
$ git add hello.txt
$ git commit -m "chore: add hello.txt as example file"
[master 851d590] chore: add hello.txt as example file
 1 file changed, 0 insertions(+), 0 deletions(-)
 create mode 100644 hello.txt
If we want to know what we’ve done recently,
we can display the project’s history using git log:
$ git log
commit 851d590a214c7859eafa0998c6c951f8e0eb359b (HEAD -> main)
Author: YOU Yu <email@mail.org>
Date:   Sat Dec 19 09:32:41 2020 -0800

    chore: add hello.txt as example file

commit 173222bf90216b408c8997f4e143572b99637750
Author: You Yu <yuyou@mail.org>
Date:   Sat Dec 19 09:30:23 2020 -0800

    .... .... ... ..
git log lists all commits made to a repository in reverse chronological order.
The listing for each commit includes
the commit’s full identifier (which starts with the same characters as the short identifier printed by git commit),
the commit’s author, when it was created, and the commit message that we wrote.
Scrolling through Logs
Our log this time isn’t very long, so you were likely able to see it printed to your screen without needing to scroll. When you begin working with longer logs (like later in this chapter), you’ll notice that the commits are shown in a pager program, as you saw in Section bash-basics-help with manual pages. You can apply the same keystrokes to scroll through the log and exit the paging program.
The last line tells us that a file Git already knows about has been modified.
Hints from Git
After executing Git commands, you may see output that differs slightly from what is shown here. For example, you may see a suggestion for
git checkoutin place ofgit restoreafter executing the code above, which means you’re running a different version of Git. As with most tasks in coding, there are often multiple commands to accomplish the same action with Git. This chapter will show output from Git version 2.29. If you see something different in your Git output, you can try the commands we present here, or follow the suggestions included in the output you see. When in doubt, check the documentation (e.g.,git checkout --help) if you get stuck.
To save those changes in the repository’s history,
we must git add and then git commit.
Before we do, though, let’s review the changes using git diff. This command shows us the differences between the current state of our repository
and the most recently saved version:
$ git diff
diff --git A/file.txt B/file.txt
index f274473..c4c5b5a 100644
--- A/file.txt
+++ B/file.txt
@@ -13,7 +13,7 @@ def main(args):
-                         Jello World
+                         Hello World
The output is cryptic, even by the standards of the Unix command line, because it is actually a series of commands telling editors and other tools how to turn the file we had into the file we have. If we break it down into pieces:
The first line tells us that Git is producing output in the format of the Unix
diffcommand.The second line tells exactly which versions of the file Git is comparing:
f274473andc4c5b5aare the short identifiers for those versions.The third and fourth lines once again show the name of the file being changed; the name appears twice in case we are renaming a file as well as modifying it.
The remaining lines show us the changes and the lines on which they occur. A minus sign
-in the first column indicates a line that is being removed, while a plus sign+shows a line that is being added. Lines without either plus or minus signs have not been changed, but are provided around the lines that have been changed to add context.
Git’s default is to compare line by line,
but it can be instructive to instead compare word by word
using the --word-diff or --color-words options.
These are particularly useful when running git diff on prose rather than code.
After reviewing our change we can commit it just as we did before:
$ git commit -m "fix: correct spelling mistake in hello.txt"
On branch main
Changes not staged for commit:
  (use "git add <file>..." to update what will be
  committed)
  (use "git restore <file>..." to discard changes in
  working directory)
	  modified:   hello.txt

no changes added to commit (use "git add" or "git commit -a")
Whoops: we forgot to add the file to the set of things we want to commit. Let’s do that and then try the commit again:
$ git add hello.txt
$ git status
On branch main
Changes to be committed:
  (use "git restore --staged <file>..." to unstage)
	  modified:  hello.txt
$ git commit -m "fix: correct spelling mistake in hello.txt"
[main 582f7f6] fix: correct spelling mistake in hello.txt
1 file changed, 1 insertion(+), 1 deletion(-)
The Staging Area
Git insists that we add files to the set we want to commit before actually committing anything. This allows us to commit our changes in stages and capture changes in logical portions rather than only large batches. For example, suppose we add a few citations to the introduction of our thesis, which is in the file
introduction.tex. We might want to commit those additions but not commit the changes toconclusion.tex(which we haven’t finished writing yet). To allow for this, Git has a special staging area where it keeps track of things that have been added to the current changeset but not yet committed (Figure Git cmdline - staging area).
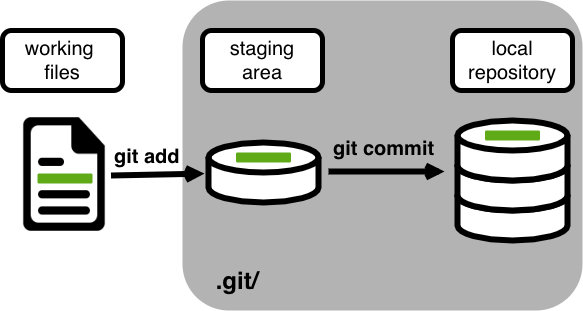
Fig. 7 Git CMDline staging area#
The Git commands we’ve covered so far (git add, git commit, git diff)
represent the tasks you perform in a basic Git workflow in a local repository
(Figure Git remote a).

Fig. 8 Git Remote#
Synchronizing with Other Repositories#
Sooner or later our computer will experience a hardware failure, be stolen, or be thrown in the lake by someone who thinks that we shouldn’t spend the entire vacation working on our thesis. Even before that happens we will probably want to collaborate with others, which we can do by linking our local repository to one stored on a hosting service such as GitHub, Gitlab, or the University of Potsdam (If you are a University of Potsdam student).
Where’s My Repository?
So far we’ve worked with repositories located on your own computer, which we’ll also refer to as local or desktop repositories. The alternative is hosting repositories on GitHub or another server, which we’ll refer to as a remote or GitHub repository.
The first steps are to create an account on GitHub,
and then select the option there to create a new remote repository
to synchronize with our local repository.
Select the option on GitHub to create a new repository,
then add the requested information for your Zipf’s Law project.
The remote repository doesn’t have to have the same name as the local one,
but we will probably get confused if they are different,
so the repository we create on GitHub will also be called zipf.
The other default options are likely appropriate for your remote repository.
Because we are synchronizing with an existing repository,
do not add a README, .gitignore, or license;
we’ll discuss these additions in other chapters.
Next, we need to connect our desktop repository with the one on GitHub. We do this by making the GitHub repository a remote of the local repository. The home page of our new repository on GitHub includes the string we need to identify it (Figure- Repo link).

Fig. 9 Git CMDline Repository link#
We can click on “HTTPS” to change the URL from SSH to HTTPS and then copy that URL.
HTTPS vs. SSH
We use HTTPS here because it does not require additional configuration. If we want to set up SSH access so that we do not have to type in our password as often, https://help.github.com/articles/generating-ssh-keys the tutorials from GitHub SSh Guide, BitBucket, or GitLab explain the steps required.
Next, let’s go into the local zipf repository and run this command:
$ cd ~/zipf
$ git remote add origin https://github.com/you/repo.git
Make sure to use the URL for your repository instead of the one shown:
the only difference should be that it includes your username instead of amira-khan.
A Git remote is like a bookmark: it gives a short name to a URL.
In this case the remote’s name is origin; we could use anything we want,
but origin is Git’s default, so we will stick with it.
We can check that the command has worked by running git remote -v (where the -v option is short for verbose):
$ git remote -v
origin	https://github.com/you/zipf.git (fetch)
origin	https://github.com/you/zipf.git (push)
Git displays two lines because it’s actually possible to set up a remote to download from one URL but upload to another. Sensible people don’t do this, so we won’t explore this possibility any further.
Now that we have configured a remote, we can push the work we have done so far to the repository on GitHub:
$ git push origin main
This may prompt us to enter our username and password; once we do that, Git prints a few lines of administrative information:
Enumerating objects: 35, done.
Counting objects: 100% (35/35), done.
Delta compression using up to 4 threads
Compressing objects: 100% (35/35), done.
Writing objects: 100% (35/35), 2.17 MiB | 602.00 KiB/s, done.
Total 35 (delta 7), reused 0 (delta 0), pack-reused 0
remote: Resolving deltas: 100% (7/7), done.
To https://github.com/you/zipf.git
 * [new branch]      main -> main
If we view our GitHub repository in the browser, it now includes all of our project files, along with all of the commits we have made so far (Figure - Git cmdline history).

Fig. 10 Git Commandline History#
We can also pull from the remote repository to the local one:
$ git pull origin main
From https://github.com/you/zipf
 * branch            main     -> FETCH_HEAD
Already up-to-date.
Pulling has no effect in this case because the two repositories are already synchronized.
Fetching
The second line in the remote configuration we viewed earlier is labeled
push, which makes sense given the command we used (git push) to upload changes from our local to remote repositories. Why is the other line labeledfetchinstead ofpull? Fetching and pulling both download new data from a remote repository, but only pulling integrates those changes into your local repository’s version history. Becausegit fetchdoesn’t alter your local files, it’s used to view changes between local and remote versions.
For the AQI project, we use GitUP to host the remote repository. After creating a new empty project there, we connect the local repository and push:
$ git remote add origin https://gitup.uni-potsdam.de/se-up/rse_course/german-air-quality-index-analyzer.git
$ git push origin main
Enumerating objects: 15, done. Counting objects: 100% (15/15), done. Writing objects: 100% (15/15), done. To https://gitup.uni-potsdam.de/se-up/rse_course/german-air-quality-index-analyzer.git * [new branch] main -> main
The Git commands we’ve covered in this section (git pull, git push)
are the main tasks associated with incorporating remote repositories into your workflow (Figure Git cmdline remote ).
Amira’s Repository
Amira’s repository referenced in this section exists on GitHub at amira-khan/zipf; you may find it a useful reference point when proceeding through the rest of the book.
Exploring History#
Git lets us look at previous versions of files and restore specific files to earlier states if we want to. In order to do these things, we need to identify the versions we want.
The two ways to do this are analogous to absolute and relative paths.
The “absolute” version is the unique identifier that Git gives to each commit.
These identifiers are 40 characters long, but in most situations Git will let us use just the first half dozen characters or so.
For example, if we run git log right now, it shows us something like this:
commit ee8684ca123e1e829fc995d672e3d7e4b00f2610
(HEAD -> main, origin/master)
Author: You Youn <you@mail.org>
Date:   Sat Dec 19 09:52:04 2020 -0800

    fix: update test.txt

commit 582f7f6f536d520b1328c04c9d41e24b54170656
Author: You You <you@email.org>
Date:   Sat Dec 19 09:37:25 2020 -0800

    fix: correct spelling mistake in hello.txt

commit 851d590a214c7859eafa0998c6c951f8e0eb359b
.....
The commit in which we changed plotcounts.py
has the absolute identifier 582f7f6f536d520b1328c04c9d41e24b54170656,
but we can use 582f7f6 to reference it in almost all situations.
While git log includes the commit message,
it doesn’t tell us exactly what changes were made in each commit.
If we add the -p option (short for patch),
we get the same kind of details git diff provides
to describe the changes in each commit:
$ git log -p
The first part of the output is shown below; we have truncated the rest, since it is very long:
commit ee8684ca123e1e829fc995d672e3d7e4b00f2610
(HEAD -> main, origin/master)
Author: You You <you@mail.org>
Date:   Sat Dec 19 09:52:04 2020 -0800

    fix: update hello.txt

diff --git a/results/dracula.png b/results/dracula.png
index c1f62fd..57a7b70 100644
Binary files a/hello.txt and
b/hello.txt differ
...
Alternatively,
we can use git diff directly to examine the differences between files at any stage in the repository’s history.
Let’s explore this with the hello.txt file.
The difference between the file as it is now and the most recent version:
diff --git a/hello.txt b/hello.txt
index c4c5b5a..c511da1 100644
--- a/hello.txt
+++ b/hello.txt
@@ -11,7 +11,6 @@ def main(args):
-    Jello World
     Hello World
git diff 582f7f6,
on the other hand,
shows the difference between the current state
and the commit referenced by the short identifier:
diff --git a/hello.txt b/hello.txt
index c4c5b5a..c511da1 100644
--- a/hello.txt
+++ b/hello.txt
@@ -11,7 +11,6 @@ def main(args):
-    Jello World
     Hello World

diff --git a/hello.txt b/hello.txt
index c1f62fd..57a7b70 100644
Binary files a/hello.png and
b/hello.png differ
Note that you will need to reference your git log to replace 582f7f6 in the code above,
since Git assigned your commit a different unique identifier.
Note also that we have not committed the last change to hello.txt;
we will look at ways of undoing it in the next section.
The “relative” version of history relies on a special identifier called HEAD, which always refers to the most recent version in the repository.
git diff HEAD therefore shows the same thing as git diff,
but instead of typing in a version identifier to back up one commit,
we can use HEAD~1 (where ~ is the tilde symbol). This shorthand is read “HEAD minus one,” and gives us the difference to the previous saved version.
git diff HEAD~2 goes back two revisions and so on.
We can also look at the differences between two saved versions
by separating their identifiers with two dots .. like this:
$ git diff HEAD~1..HEAD~2
diff --git a/hello.txt b/hello.txt
index c4c5b5a..c511da1 100644
--- a/hello.txt
+++ b/hello.txt
@@ -11,7 +11,6 @@ def main(args):
-    Jello World
     Hello World
If we want to see the changes made in a particular commit, we can use git show with an identifier and a filename:
If we wanted to view the contents of a file at a given point in the version history, we could use the same command, but separating the identifier and file with a colon:
$ git show HEAD~1:hello.txt
This allows us to look through the file using a paging program.
Restoring Old Versions of Files#
We can see what we changed, but how can we restore it?
Suppose we change our mind about the last update to bin/plotcounts.py
(removing df['inverse_rank'] = 1 / df['rank'])
before we add or commit it.
git status tells us that the file has been changed, but those changes haven’t been staged:
$ git status
On branch main
Changes not staged for commit:
  (use "git add <file>..." to update what will be
  committed)
  (use "git restore <file>..." to discard changes in
  working directory)
	modified:   hello.txt

no changes added to commit (use "git add" or "git commit -a")
We can put things back the way they were in the last saved revision
using git restore, as the screen output suggests:
$ git restore hello.txt
$ git status
On branch main
nothing to commit, working tree clean
As its name suggests,
git restore restores an earlier version of a file.
In this case,
we used it to recover the version of the file in the most recent commit.
Checking Out with Git
If you’re running a different version of Git, you may see a suggestion for
git checkoutinstead ofgit restore. As of Git version 2.49,git restoreis still an experimental command, and operates as a specialized form ofgit checkout.git checkout HEAD hello.txtis equivalent to the last command run.
Because git restore is designed to restore working files,
we’ll need to use git checkout to revert to earlier versions of files.
We can use a specific commit identifier rather than HEAD to go back as far as we want:
$ git checkout 851d590 hello.txt
Updated 1 path from c8d6a33
Doing this does not change the history:
git log still shows our four commits.
Instead,
it replaces the content of the file with the old content:
$ git status
On branch master
Changes to be committed:
  (use "git restore --staged <file>..." to unstage)
	  modified:   hello.txt
Because checking out the changes added them to the staging area, we need to first remove them from the staging area:
$ git restore --staged hello.txt
However, the changes have been unstaged but still exist in the file. We can return the file to the state of the most recent commit:
$ git restore hello.txt
$ git status
On branch main
nothing to commit, working tree clean
We have restored the most recent commit. Since we didn’t commit the change that removed the line that calculates the inverse rank, that work is now lost: Git can only go back and forth between committed versions of files.
This section has demonstrated a few different ways to view differences among versions, and to work with those changes (Figure Git cmdline - Remote c).
These commands can operate on either individual files or entire commits,
and the behavior of them can sometimes differ based on your version of Git.
Remember to reference documentation, and use git status and git log frequently to understand your workflow.
Ignoring Files#
We don’t always want Git to track every file’s history.
For example,
we might want to track text files with names ending in .txt
but not data files with names ending in .dat.
To stop Git from telling us about these files every time we call git status,
we can create a file in the root directory of our project called .gitignore.
This file can contain filenames like thesis.pdf or wildcard patterns like *.dat. Each must be on a line of its own, and Git will ignore anything that matches any of these lines. For now we only need one entry in our .gitignore file:
__pycache__
which tells Git to ignore any __pycache__ directory created by Python Section (Scripting Modules in Python).
The AQI project’s .gitignore covers a broader set of patterns,
since the project includes Python source files, notebooks, and data:
# Python
__pycache__/
*.py[cod]
*.egg-info/
dist/
build/

# Jupyter
.ipynb_checkpoints/

# Data — raw files are tracked; large outputs are not
data/processed/

# Environment
.env
.venv/
These patterns keep the repository focused on source files and documentation while excluding temporary outputs and environment-specific files.
Remember to Ignore
Don’t forget to commit
.gitignoreto your repository so that Git knows to use it.
Summary#
The biggest benefit of version control for individual research is that we can always go back to the precise set of files that we used to produce a particular result. While Git is complex [Perez De Rosso and Jackson, 2013], being able to back up our changes on sites like GitHub with just a few keystrokes can save us a lot of pain, and some of Git’s advanced features make it even more powerful. We will explore these in the next chapter.
Keypoints#
Use
git configwith the--globaloption to configure your username, email address, and other preferences once per machine.git initinitializes a repository.Git stores all repository management data in the
.gitsubdirectory of the repository’s root directory.git statusshows the status of a repository.git addputs files in the repository’s staging area.git commitsaves the staged content as a new commit in the local repository.git loglists previous commits.git diffshows the difference between two versions of the repository.Synchronize your local repository with a remote repository
on a forge such as GitHub.git remotemanages bookmarks pointing at remote repositories.git pushcopies changes from a local repository to a remote repository.git pullcopies changes from a remote repository to a local repository.git restoreandgit checkoutrecover old versions of files.The
.gitignorefile tells Git what files to ignore.